4 - Turning it into a Real Network
4.1 More than two nodes
Now we’ll make a big step: create several tic modules and connect
them into a network. For now, we’ll keep it simple what they do:
one of the nodes generates a message, and the others keep tossing
it around in random directions until it arrives at
a predetermined destination node.
The NED file will need a few changes. First of all, the Txc module will
need to have multiple input and output gates:
simple Txc10
{
    parameters:
        @display("i=block/routing");
    gates:
        input in[];  // declare in[] and out[] to be vector gates
        output out[];
}
The [ ] turns the gates into gate vectors. The size of the vector
(the number of gates) will be determined where we use Txc to build
the network.
network Tictoc10
{
    submodules:
        tic[6]: Txc10;
    connections:
        tic[0].out++ --> {  delay = 100ms; } --> tic[1].in++;
        tic[0].in++ <-- {  delay = 100ms; } <-- tic[1].out++;

        tic[1].out++ --> {  delay = 100ms; } --> tic[2].in++;
        tic[1].in++ <-- {  delay = 100ms; } <-- tic[2].out++;

        tic[1].out++ --> {  delay = 100ms; } --> tic[4].in++;
        tic[1].in++ <-- {  delay = 100ms; } <-- tic[4].out++;

        tic[3].out++ --> {  delay = 100ms; } --> tic[4].in++;
        tic[3].in++ <-- {  delay = 100ms; } <-- tic[4].out++;

        tic[4].out++ --> {  delay = 100ms; } --> tic[5].in++;
        tic[4].in++ <-- {  delay = 100ms; } <-- tic[5].out++;
}
Here we created 6 modules as a module vector, and connected them.
The resulting topology looks like this:
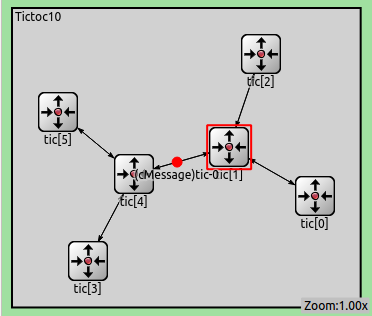
In this version, tic[0] will generate the message to be sent around.
This is done in initialize(), with the help of the getIndex() function which
returns the index of the module in the vector.
The meat of the code is the forwardMessage() function which we invoke
from handleMessage() whenever a message arrives at the node. It draws
a random gate number, and sends out message on that gate.
void Txc10::forwardMessage(cMessage *msg)
{
    // In this example, we just pick a random gate to send it on.
    // We draw a random number between 0 and the size of gate `out[]'.
    int n = gateSize("out");
    int k = intuniform(0, n-1);

    EV << "Forwarding message " << msg << " on port out[" << k << "]\n";
    send(msg, "out", k);
}
When the message arrives at tic[3], its handleMessage() will delete the message.
Exercise
You’ll notice that this simple “routing” is not very efficient:
often the packet keeps bouncing between two nodes for a while before it is sent
to a different direction. This can be improved somewhat if nodes don’t send
the packet back to the sender. Implement this. Hints: cMessage::getArrivalGate(),
cGate::getIndex(). Note that if the message didn’t arrive via a gate but was
a self-message, then getArrivalGate() returns nullptr.
Sources: tictoc10.ned, txc10.cc, omnetpp.ini
4.2 Channels and inner type definitions
Our new network definition is getting quite complex and long, especially
the connections section. Let’s try to simplify it. The first thing we
notice is that the connections always use the same delay parameter.
It is possible to create types for the connections (they are called channels)
similarly to simple modules. We should create a channel type which specifies the
delay parameter and we will use that type for all connections in the network.
network Tictoc11
{
    types:
        channel Channel extends ned.DelayChannel {
            delay = 100ms;
        }
    submodules:
As you have noticed we have defined the new channel type inside the network definition
by adding a types section. This type definition is only visible inside the
network. It is called as a local or inner type. You can use simple modules as inner types
too, if you wish.
Note
We have created the channel by specializing the built-in DelayChannel.
(built-in channels can be found inside the ned package. Thats why we used
the full type name ned.DelayChannel) after the extends keyword.
Now let’s check how the connections section changed.
    connections:
        tic[0].out++ --> Channel --> tic[1].in++;
        tic[0].in++ <-- Channel <-- tic[1].out++;

        tic[1].out++ --> Channel --> tic[2].in++;
        tic[1].in++ <-- Channel <-- tic[2].out++;

        tic[1].out++ --> Channel --> tic[4].in++;
        tic[1].in++ <-- Channel <-- tic[4].out++;

        tic[3].out++ --> Channel --> tic[4].in++;
        tic[3].in++ <-- Channel <-- tic[4].out++;

        tic[4].out++ --> Channel --> tic[5].in++;
        tic[4].in++ <-- Channel <-- tic[5].out++;
}
As you see we just specify the channel name inside the connection definition. This allows to easily change the delay parameter for the whole network.
Sources: tictoc11.ned, txc11.cc, omnetpp.ini
4.3 Using two-way connections
If we check the connections section a little more, we will realize that
each node pair is connected with two connections. One for each direction.
OMNeT++ 4 supports two way connections, so let’s use them.
First of all, we have to define two-way (or so called inout) gates instead of the
separate input and output gates we used previously.
simple Txc12
{
    parameters:
        @display("i=block/routing");
    gates:
        inout gate[];  // declare two way connections
}
The new connections section would look like this:
    connections:
        tic[0].gate++ <--> Channel <--> tic[1].gate++;
        tic[1].gate++ <--> Channel <--> tic[2].gate++;
        tic[1].gate++ <--> Channel <--> tic[4].gate++;
        tic[3].gate++ <--> Channel <--> tic[4].gate++;
        tic[4].gate++ <--> Channel <--> tic[5].gate++;
}
We have modified the gate names so we have to make some modifications to the C++ code.
void Txc12::forwardMessage(cMessage *msg)
{
    // In this example, we just pick a random gate to send it on.
    // We draw a random number between 0 and the size of gate `gate[]'.
    int n = gateSize("gate");
    int k = intuniform(0, n-1);

    EV << "Forwarding message " << msg << " on gate[" << k << "]\n";
    // $o and $i suffix is used to identify the input/output part of a two way gate
    send(msg, "gate$o", k);
}
Note
The special $i and $o suffix after the gate name allows us to use the
connection’s two direction separately.
Sources: tictoc12.ned, txc12.cc, omnetpp.ini
4.4 Defining our message class
In this step the destination address is no longer hardcoded tic[3] – we draw a
random destination, and we’ll add the destination address to the message.
The best way is to subclass cMessage and add destination as a data member.
Hand-coding the message class is usually tedious because it contains
a lot of boilerplate code, so we let OMNeT++ generate the class for us.
The message class specification is in tictoc13.msg:
message TicTocMsg13
{
    int source;
    int destination;
    int hopCount = 0;
}
Note
See Message Definitions of the manual for more details on messages.
The makefile is set up so that the message compiler, opp_msgc is invoked
and it generates tictoc13_m.h and tictoc13_m.cc from the message declaration
(The file names are generated from the tictoc13.msg file name, not the message type name).
They will contain a generated TicTocMsg13 class subclassed from cMessage;
the class will have getter and setter methods for every field.
We’ll include tictoc13_m.h into our C++ code, and we can use TicTocMsg13 as
any other class.
#include "tictoc13_m.h"
For example, we use the following lines in generateMessage() to create the
message and fill its fields.
TicTocMsg13 *msg = new TicTocMsg13(msgname);
msg->setSource(src);
msg->setDestination(dest);
return msg;
Then, handleMessage() begins like this:
void Txc13::handleMessage(cMessage *msg)
{
    TicTocMsg13 *ttmsg = check_and_cast<TicTocMsg13 *>(msg);

    if (ttmsg->getDestination() == getIndex()) {
In the argument to handleMessage(), we get the message as a cMessage* pointer.
However, we can only access its fields defined in TicTocMsg13 if we cast
msg to TicTocMsg13*. Plain C-style cast ((TicTocMsg13 *)msg)
is not safe because if the message is not a TicTocMsg13 after all
the program will just crash, causing an error which is difficult to explore.
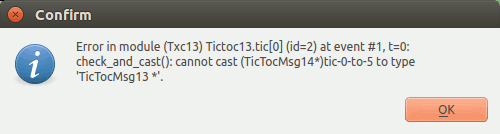
C++ offers a solution which is called dynamic_cast. Here we use check_and_cast<>()
which is provided by OMNeT++: it tries to cast the pointer via dynamic_cast,
and if it fails it stops the simulation with an error message, similar to the
following:
In the next line, we check if the destination address is the same as the
node’s address. The getIndex() member function returns the index
of the module in the submodule vector (remember, in the NED file we
declared it as tic[6]: Txc13, so our nodes have addresses 0..5).
To make the model execute longer, after a message arrives to its destination the destination node will generate another message with a random destination address, and so forth.
When you run the model, it’ll look like this:
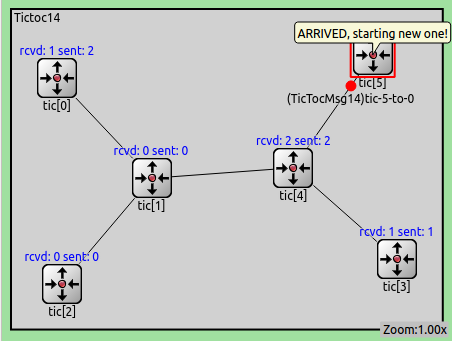
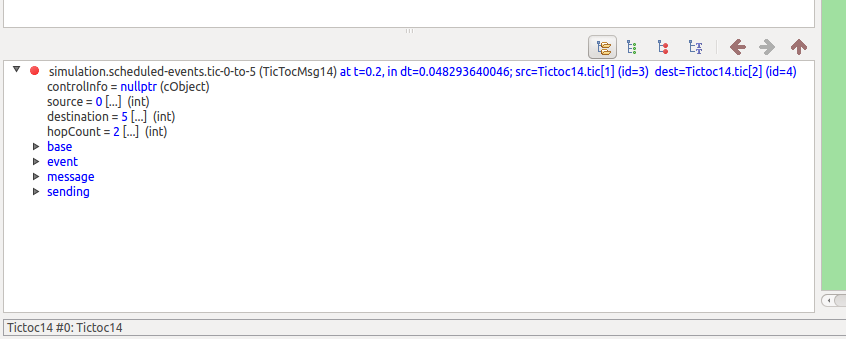
You can click on the messages to see their content in the inspector window. Double-clicking will open the inspector in a new window. (You’ll either have to temporarily stop the simulation for that, or to be very fast in handling the mouse). The inspector window displays lots of useful information; the message fields can be seen on the Contents page.
Exercise
In this model, there is only one message underway at any given moment: nodes only generate a message when another message arrives at them. We did it this way to make it easier to follow the simulation. Change the module class so that instead, it generates messages periodically. The interval between messages should be a module parameter, returning exponentially distributed random numbers.
Sources: tictoc13.ned, tictoc13.msg, txc13.cc, omnetpp.ini