macOS
Supported Releases
This chapter provides additional information for installing OMNeT++ on macOS.
The following release is known to work:
macOS 15 (and likely newer versions)
Installing the Prerequisite Packages
Install the command line developer tools for macOS (compiler, debugger, etc.)
$ xcode-select --install
Installing additional packages will enable more functionality in OMNeT++; see the Additional packages section at the end of this chapter.
Using Homebrew
The install.sh script relies on Homebrew (https://brew.sh) for installing
prerequisite packages on all modern macOS systems (both Intel and Apple-Silicon).
If you don’t have Homebrew installed, follow the instructions on its website.
Once Homebrew is ready, ensure its environment is set up correctly in your shell.
Typically, this involves adding a line to your shell profile
(e.g., .zprofile or .bash_profile):
eval "$(/opt/homebrew/bin/brew shellenv)"
Restart your terminal or source your profile script for the changes to take effect.
Install the core development tools and libraries using Homebrew:
$ brew install bison ccache flex perl python@3 make pkg-config doxygen graphviz
Next, install packages for the graphical environment (Qtenv and IDE). If you do not need GUI support, you can skip this step and later configure OMNeT++ with WITH_QTENV=no and WITH_OSG=no.
$ brew install qt@6
For 3D visualization support in Qtenv, install the OpenSceneGraph package. If you do not need 3D support, you can skip this step and later configure OMNeT++ with WITH_OSG=no.
$ brew install openscenegraph
After installing packages with Homebrew, set up a Python virtual environment for OMNeT++. In the root directory of your OMNeT++ download:
$ python3 -m venv .venv --upgrade-deps --clear --prompt "omnetpp/.venv"
$ source .venv/bin/activate
Then, install the required Python packages into the virtual environment:
$ python3 -m pip install -r python/requirements.txt
Note
Make sure you are using python3 from Homebrew (check with which python3). The system Python provided by macOS should generally not be used for development with OMNeT++.
If you skip the GUI or 3D packages, remember to disable the corresponding features (WITH_QTENV=no, WITH_OSG=no) in configure.user or during the ./configure step.
Enabling Development Mode in Terminal
MacOS has a strict default security policy that prevents the execution of unsigned code. This behavior often interferes with the development process so you must explicitly allow running unsigned code from a Terminal. On the System Preferences / Security and Privacy / Privacy tab, select Development Tools on the left side, unlock the panel with the lock icon on the bottom left and select the Terminal app on the right side to override the default security policy for the Terminal app.
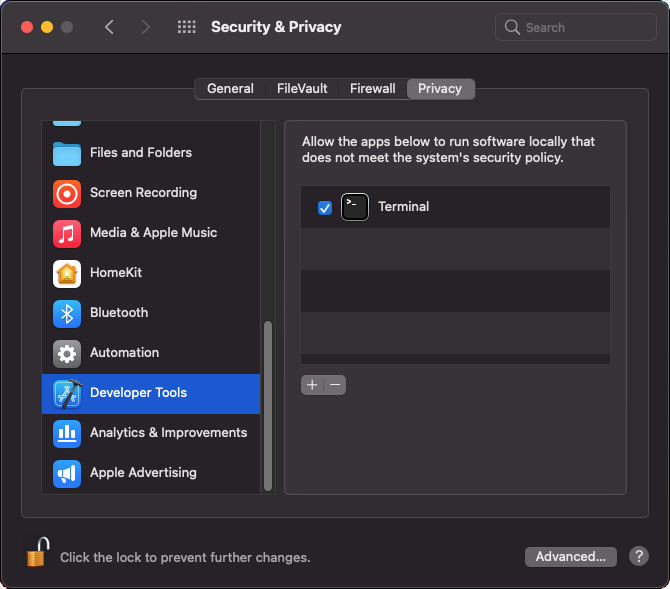
Fig. 1 Enable Running Unsigned Code in Terminal
Note
If you do not see the Terminal item in the Development Tools section, you should execute spctl developer-mode enable-terminal in the terminal and then restart System Preferences applet.
Debugging Unsigned Code
Even if you have enabled development mode in the terminal, missing code signatures will still cause problems during debugging, because the debugged process is started by the IDE, not the terminal. To be able to debug, you must disable code signature checking globally by typing:
$ sudo spctl --global-disable
After issuing the above command go to System Preferences / Security and Privacy / General and select Any at the bottom of the dialog. After restarting your terminal application, you will be able to debug your unsigned simulation models.
Additional Steps Required on macOS to Use the Debugger
The Command Line Developer Tools package contains the lldb debugger. If you are upgrading from an earlier
version of OMNeT++, be sure to delete and recreate all Launch Configurations in the IDE. This is required because
older Launch Configurations were using gdb as the debugger, but the new IDE uses lldb-dap as the debugger
executable.
On the first debug session the OS may prompt you to allow debugging with the lldb executable.
Downloading and Unpacking OMNeT++
Download OMNeT++ from https://omnetpp.org. Make sure you select to download
the macOS specific archive matching your machine’s architecture,
omnetpp-6.4-macos-aarch64.tgz (for Apple Silicon) or
omnetpp-6.4-macos-x86_64.tgz (for Intel-based Macs).
Copy the archive to the directory where you want to install it. This is usually your home directory, /Users/<you>.
Open a terminal, and extract the archive using the following command:
$ tar zxvf omnetpp-6.4-macos-aarch64.tgz
A subdirectory called omnetpp-6.4 will be created, containing the simulator files.
Alternatively, you can also unpack the archive using Finder.
Note
The Terminal can be found in the Applications / Utilities folder.
Environment Variables
In general OMNeT++ requires that certain environment variables are set and the
omnetpp-6.4/bin directory is in the PATH. Source the setenv
script to set up all these variables.
$ cd omnetpp-6.4
$ source setenv
To set the environment variables permanently, edit .profile, .zprofile or .zshenv in your home directory and
add a line something like this:
[ -f "$HOME/omnetpp-6.4/setenv" ] && source "$HOME/omnetpp-6.4/setenv"
Configuring and Building OMNeT++
Check configure.user to make sure it contains the settings you need. In most cases you don’t need to change anything
in it.
In the top-level OMNeT++ directory, type:
$ ./configure
The configure script detects installed software and configuration of your system. It writes the results into the
Makefile.inc file, which will be read by the makefiles during the build process.
Note
If there is an error during configure, the output may give hints about what went wrong. Scroll up to see the
messages. (You may need to increase the scrollback buffer size of the terminal and re-run ./configure.) The
script also writes a very detailed log of its operation into config.log to help track down errors. Since
config.log is very long, it is recommended that you open it in an editor and search for phrases like error or
the name of the package associated with the problem.
When ./configure has finished, you can compile OMNeT++. Type in the terminal:
$ make
Tip
To take advantage of multiple processor cores, add the -j4 option to the make command line.
Note
The build process will not write anything outside its directory, so no special privileges are needed.
Tip
The make command will seemingly compile everything twice. This is because both debug and optimized versions of the
libraries are built. If you only want to build one set of the libraries, specify MODE=debug or MODE=release:
Verifying the Installation
You can now verify that the sample simulations run correctly. For example, the aloha simulation is started by entering the following commands:
$ cd samples/aloha
$ ./aloha
By default, the samples will run using the Qtenv environment. You should see nice gui windows and dialogs.
Starting the IDE
OMNeT++ comes with an Eclipse-based simulation IDE.
Start the IDE by typing:
$ omnetpp
If you would like to be able to launch the IDE via Applications, the Dock or a desktop shortcut, do the following: open
the omnetpp-6.4 folder in Finder, go into the ide subfolder, create an alias for the omnetpp program
there (right-click, Make Alias), and drag the new alias into the Applications folder, onto the Dock, or onto the
desktop.
Alternatively, run one or both of the commands below:
$ make install-menu-item
$ make install-desktop-icon
which will do roughly the same.
Using the IDE
When you try to build a project in the IDE, you may get the following warning message:
Toolchain “…” is not supported on this platform or installation. Please go to the Project menu, and activate a different build configuration. (You may need to switch to the C/C++ perspective first, so that the required menu items appear in the Project menu.)
If you encounter this message, choose Project > Properties > C/C++ Build > Tool Chain Editor > Current toolchain > GCC for OMNeT++.
The IDE is documented in detail in the User Guide.
Reconfiguring the Libraries
If you need to recompile the OMNeT++ components with different flags (e.g. different optimization), then change the
top-level OMNeT++ directory, edit configure.user accordingly, then type:
$ ./configure
$ make clean
$ make
Tip
To take advantage of multiple processor cores, add the -j4 option to the make command line.
If you want to recompile just a single library, then change to the directory of the library (e.g. cd src/sim) and
type:
$ make clean
$ make
By default, libraries are compiled in both debug and release mode. If you want to make release or debug builds only, use:
$ make MODE=release
or
$ make MODE=debug
By default, shared libraries will be created. If you want to build static libraries, set SHARED_LIBS=no in
configure.user and re-configure your project.
Note
The built libraries and programs are immediately copied to the lib/ and bin/ subdirectories.
Additional Packages
OpenMPI
MacOS does not come with OpenMPI, so you must install it manually. You can install it from the Homebrew repo
(http://brew.sh) by typing brew install open-mpi. In this case, you have to manually set the MPI_CFLAGS and MPI_LIBS
variables in configure.user and re-run ./configure.
Akaroa
Akaroa 2.7.9, which is the latest version at the time of writing, does not support macOS. You may try to port it using the porting guide from the Akaroa distribution.