C++ Development
Introduction
The OMNeT++ IDE contains editors, views, and other tools to assist you in developing your C++ code. C++ files open in the IDE in the C++ source editor. The C++ source editor supports syntax highlighting, documentation tooltips, content assist, automatic indentation, code formatting, refactoring, and several other useful features. The IDE also allows you to configure the build, start the build process, launch simulations, and debug the model without leaving the IDE.
Most of these features are provided by the Eclipse CDT (C/C++ Development Tooling) project (http://eclipse.org/cdt). This chapter briefly explains the basics of using CDT to develop simulation models. If you want to learn more about how to use CDT effectively, we recommend that you read the CDT documentation in the IDE help system (Help/Help Content).
The OMNeT++ IDE extends CDT with the following features to facilitate model development:
A new OMNeT++ project creation wizard enables you to create simple, working simulation models in one step.
Makefiles are automatically generated for your project based on the project build configuration. The built-in makefile generator is compatible with the command line opp_makemake tool and features deep makefiles, recursive make, cross-project references, invoking the message compiler, automatic linking with the OMNeT++ libraries, and support for building executables, shared libraries, or static libraries.
Makefile generation and the project build system can be configured using a GUI interface.
Project Features: Large projects can be partitioned into smaller units that can be independently excluded or included in the build. Disabling parts of the project can significantly reduce build time or make it possible to build the project at all.
Prerequisites
The OMNeT++ IDE (and the OMNeT++ simulation framework itself) requires a preinstalled compiler toolchain to function properly.
On Windows: The OMNeT++ distribution comes with a preconfigured MinGW compiler toolchain. There is no need to manually install anything. By default, the IDE uses the Clang compiler from MinGW, but it is also possible to switch to the GCC compiler (also part of MinGW).
On Linux: By default, the Clang compiler is used, but OMNeT++ falls back to using GCC if Clang is not present on the system. You have to install Clang or GCC on your system before trying to compile a simulation with OMNeT++. Please read the Install Guide for detailed instructions.
On macOS: You need to install Xcode Developer Tools to get compiler support before trying to compile a simulation with OMNeT++. Please read the Install Guide for detailed instructions.
Creating a C++ Project
To create an OMNeT++ project that supports C++ development, select .
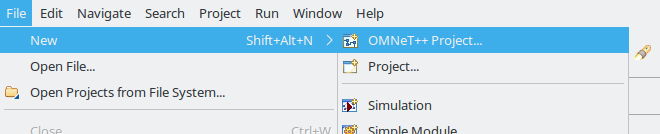
Fig. 66 Creating an OMNeT++ project
This menu item will bring up the New OMNeT++ Project wizard. The wizard lets you create an OMNeT++-specific project, which includes support for NED, MSG, and INI file editing, as well as C++ development of simple modules.
On the first page of the wizard, specify the project name and ensure that the Support C++ Development checkbox is selected.
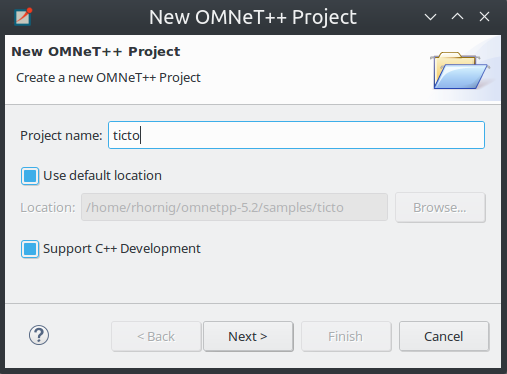
Fig. 67 Setting project name and enabling C++ support
Select a project template. A template defines the initial content and layout of the project.
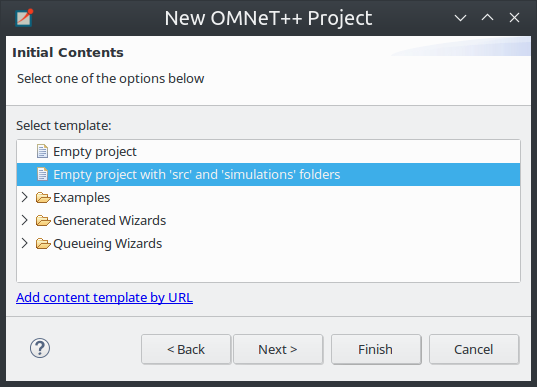
Fig. 68 Selecting a project template
Select a toolchain that is supported on your platform. Usually, you will see only a single supported toolchain, so there is no need to change anything on the page.
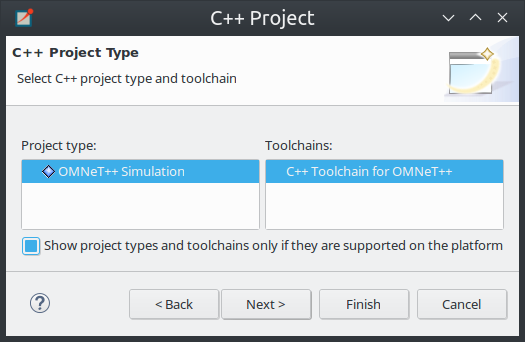
Fig. 69 Selecting a toolchain
Finally, select one or more from the preset build configurations. A configuration is a set of options that are associated with the build process. It is mainly used to build debug and release versions of your program.
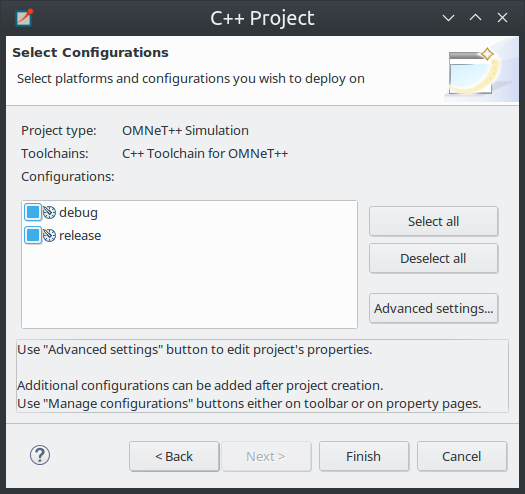
Fig. 70 Selecting configurations
Clicking the Finish button will create the project.
Editing C++ Code
The OMNeT++ IDE comes with a C/C++ editor. In addition to standard editing features, the C/C++ editor provides syntax highlighting, content assistance, and other C++ specific functionality. The source is continually parsed as you type, and errors and warnings are displayed as markers on the editor rulers.
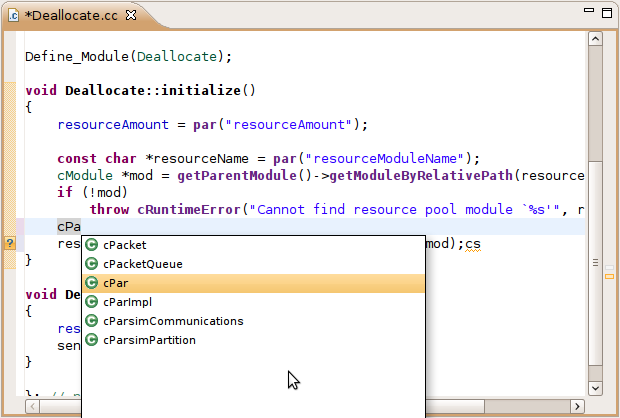
Fig. 71 C++ source editor
The C++ Editor
The C++ source editor provides the usual features of Eclipse-based text editors, such as syntax highlighting, clipboard cut/copy/paste, unlimited undo/redo, folding, find/replace, and incremental search.
The IDE scans and indexes the C++ files in your project in the background and provides navigation and code analysis features based on that knowledge. This database is kept up to date as you edit the source.
Basic Functions
Some of the most useful features of the source editor:
Undo Ctrl+Z, Redo Ctrl+Y
Switch between a C++ source and its matching header file Ctrl+TAB
Indent/unindent code blocks TAB / Shift+TAB
Correct indentation Ctrl+I
Move lines Alt+UP / Alt+DOWN
Find Ctrl+F, incremental search Ctrl+J
Tip
The following functions help you explore the IDE:
Ctrl+Shift+L brings up a window listing all keyboard bindings, and
Ctrl+3 shows a filtered list of all available commands.
View Documentation
Hovering the mouse over an identifier displays its declaration and the documentation comment in a “tooltip” window. The window can be made persistent by hitting F2.
Tip
If you are on Ubuntu and see all-black tooltips, you need to change the tooltip colors in Ubuntu; see the Ubuntu chapter of the Installation Guide for details.
Content Assist
If you need help, just press Ctrl+SPACE. The editor will offer possible completions (variable names, type names, argument lists, etc.).
Navigation
Hitting F3 or holding the Ctrl key and clicking an identifier will jump to the definition/declaration.
The Eclipse platform’s bookmarking and navigation history facilities are also available in the C++ editor.
Commenting
To comment out the selected lines, press Ctrl+/. To remove the comment, press Ctrl+/ again.
Open Type
Pressing Ctrl+Shift+T will bring up the Open Element dialog, which lets you type a class name, method name, or any other identifier and opens its declaration in a new editor.
Exploring the Code
The editor offers various ways to explore the code: Open Declaration F3, Open Type Hierarchy F4, Open Call Hierarchy Ctrl+Alt+H, Quick Outline Ctrl+O, Quick Type Hierarchy Ctrl+T, Explore Macro Expansion Ctrl+=, Search for References Ctrl+Shift+G, etc.
Refactoring
Several refactoring operations are available, such as Rename Shift+Alt+R.
Note
Several features such as content assist, go to definition, type hierarchy, and refactorings rely on the Index. The index contains the locations of all functions, classes, enums, defines, etc. in the project and referenced projects. Initial indexing of large projects may take a significant amount of time. The index is kept up to date mostly automatically, but occasionally it may be necessary to manually request reindexing the project. Index-related actions can be found in the Index submenu of the project’s context menu.
Include Browser View
Dropping a C++ file into the Include Browser View displays the include files used by the C++ file (either directly or indirectly).
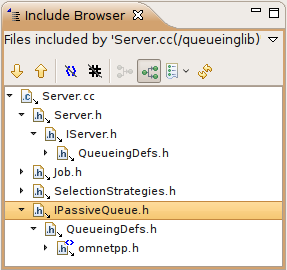
Fig. 72 Include Browser
Outline View
During source editing, the Outline View gives you an overview of the structure of your source file and can be used to quickly navigate within the file.
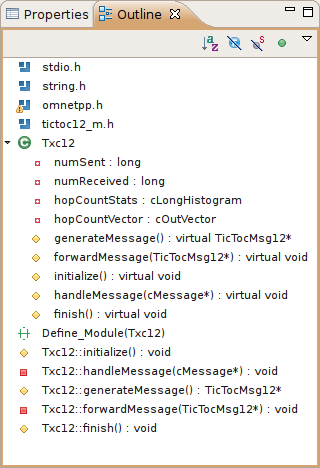
Fig. 73 Navigating with the Outline View
Type Hierarchy View
Displaying the C++ type hierarchy may be helpful in understanding the inheritance relationships among your classes (and among OMNeT++ classes).
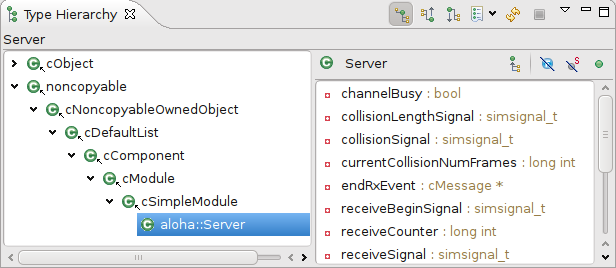
Fig. 74 C++ Type hierarchy
Building the Project
Basics
Once you have created your source files and configured your project settings, you can build the project by selecting Build Project from the Project menu or from the project context menu. You can also press Ctrl+B to build all open projects in the workspace.
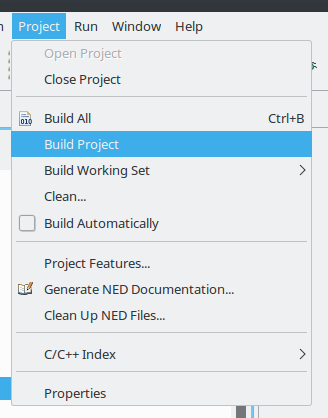
Fig. 75 Building a project
Build Output
The build output (standard output and standard error) is displayed in the Console View as the build progresses. Errors and warnings parsed from the output are displayed in the Problems View. Double-clicking a line in the Problems View will jump to the corresponding source line. Conversely, the Console View is more useful when you want to look at the build messages in their natural order (Problems View is usually sorted), for example when you get a lot of build errors and you want to begin by looking at the first one.
Makefile Generation
When you start the build process, a makefile is created or refreshed in each folder where makefile creation is
configured. After that, make will be invoked with the all target in the folder configured as the build root.
Note
During the build process, the makefile will print out only the names of the compiled files. If you want to see the
full command line used to compile each file, specify V=1 (verbose on) on the make command line. To add this
option, open and replace all with all V=1 on
the Build target line.
Cleaning the Project
To clean the project, choose Clean from the Project menu or Clean Project from
the project context menu. This will invoke make with the clean target in the project’s build root folder, and
also in referenced projects. To clean only the local project and keep referenced projects intact, use Clean
Local from the project context menu (see next section).
Referenced Projects and the Build Process
When you start the build, the IDE will build the referenced projects first. When you clean the project, the IDE will also clean the referenced projects first. This is often inconvenient (especially if your project depends on a large third-party project). To avoid cleaning the referenced projects, use Clean Local from the project context menu.
Build Configurations
A project is built using the active build configuration. A project may have several build configurations, where each configuration selects a compiler toolchain, debug or release mode, defines symbols, etc. To set the active build configuration, choose from the project context menu.
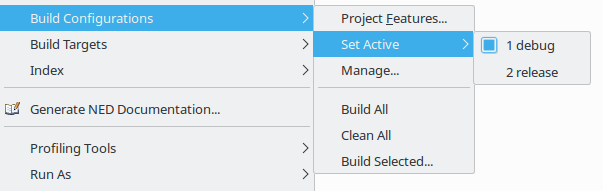
Fig. 76 Activating a build configuration
Console View
The Console View displays the output of the build process.
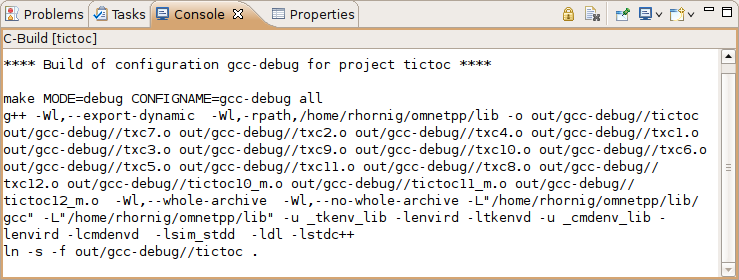
Fig. 77 Build output in a console
Problems View
The Problems View contains the errors and warnings generated by the build process. You can browse the problem list and double-click any message to go to the problem location in the source file. NED file and INI file problems are also reported in this view along with C++ problems. The editors are annotated with these markers as well. Hover over an error marker in the editor window to get the corresponding message as a tooltip.
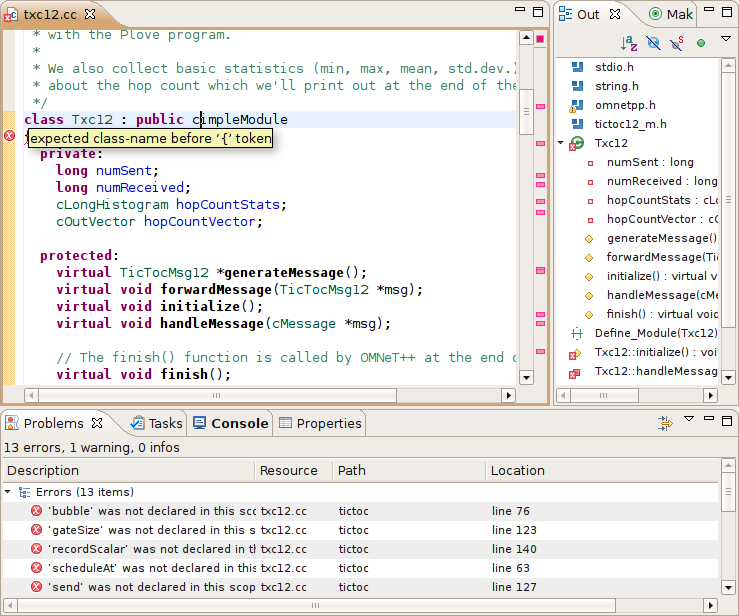
Fig. 78 C++ problems
Configuring the Project
Configuring the Build Process
The make invocation can be configured on the C/C++ Build page of the Project Properties dialog. Most settings are already set correctly and do not need to be changed. One exception is the Enable parallel build option on the Behavior tab that you may want to enable, especially if you have a multi-core computer.
Warning
Do not set the number of parallel jobs to be significantly higher than the number of CPU cores you have. In particular, never turn on the Use unlimited jobs option, as it will start an excessive number of compile processes and can easily consume all available memory in the system.
We do not recommend changing any setting on property pages under the C/C++ Build tree node.
Managing Build Configurations
A project may have several build configurations, where each configuration describes the selected compiler toolchain, debug or release mode, extra include and linker paths, defined symbols, etc. You can activate, create, or delete build configurations under the Build Configurations submenu of the project context menu.
Note
Make sure that the names of all configurations contain the debug or release substring. The IDE launcher uses
the name of the configuration to switch to the matching configuration depending on whether you want to debug or run
the simulation.
Configuring the Project Build System
OMNeT++ uses makefiles to build the project. You can use a single makefile for the entire project or a hierarchy of makefiles. Each makefile may be hand-written (provided by you) or generated automatically. The IDE offers several options for automatically created makefiles.
The build system for an OMNeT++ project can be configured on the page of the Project Properties dialog. All settings on this page will affect all build configurations.
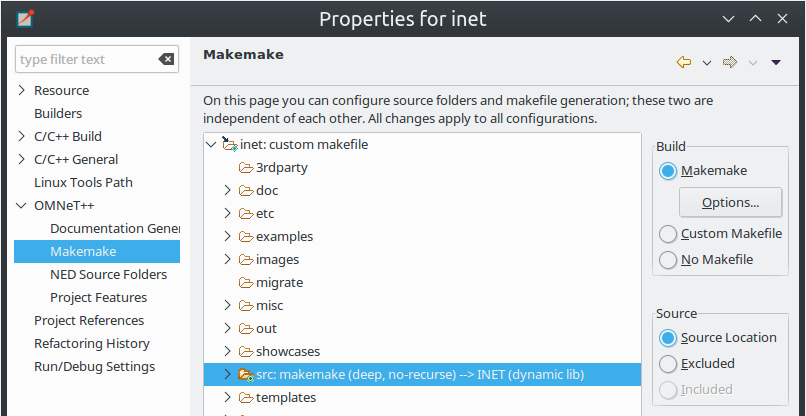
Fig. 79 Configuring Makefiles
Folders and Makefiles
The page displays the folder tree of the project. Using controls on the page (Build group in the top-right corner), you can declare that a selected folder contains a hand-written (custom) makefile or tell the IDE to generate a makefile for you. Generated makefiles will be automatically refreshed before each build. If a makefile is configured for a folder, the makefile kind will be indicated with a small decoration on the folder icon.
The build root folder is indicated with a small arrow. This is the folder in which the IDE’s Build function will invoke the make command, so it should contain a makefile. It is expected that this makefile will build the entire project by invoking all other makefiles, either directly or indirectly. By default, the build root folder is the project root. This is usually fine, but if you really need to change the project build root, overwrite the Build location setting in the C/C++ Build page of the same dialog.
Note
All generated makefiles will be named Makefile. Custom makefiles are also expected to have this name.
Source Folders
In addition to makefiles, you also need to specify where your C++ files are located (source folders). This is usually
the src folder of the project or, for small projects, the project root. It is also possible to exclude folders from
a source folder. The controls on the bottom-right part of the dialog (Source group) allow you to set up
source folders and exclusions for the project. Source files outside source folders or in an excluded folder will be
ignored by both the IDE and the build process.
Note
Source folders and exclusions configured on this page actually modify the contents of the Source Location tab of the page of the project properties dialog, and the changes will affect all build configurations.
Automatically created makefiles are by default deep, meaning that they include all (non-excluded) source files under them in the build. That is, a source file will be included in the build if it is under a source folder and covered by a makefile. (This applies to automatically generated makefiles; the IDE has no control over the behavior of custom makefiles.)
Makefile Generation
Makefile generation for the selected folder can be configured on the Makemake Options dialog, which can be accessed by clicking the Options button on the page. The dialog is described in the next section.
Command-line Build
To recreate your makefiles on the command line, you can export the settings by clicking the Export button.
This action will create a file named makemakefiles. After exporting, execute make -f makemakefiles from
the command line.
Configuring Makefile Generation for a Folder
Makefile generation for a folder can be configured on the Makemake Options dialog. To access the dialog, open the page in the Project Properties dialog, select the folder, make sure makefile generation is enabled for it, and click the Options button.
The following sections describe each page of the dialog.
The Target Tab
On the first, Target tab of the dialog, you can specify how the final target of the makefile is created.
Target type: The build target can be an executable, a shared or static library, or the linking step may be omitted altogether. Makemake options:
--make-so,--make-lib,--nolinkExport this shared/static library for other projects: This option is observed if a library (shared or static) is selected as the target type and works in conjunction with the Link with libraries exported from referenced projects option on the Link tab. Namely, referencing projects will automatically link with this library if both the library is exported from this project AND linking with exported libraries is enabled in the referencing project. Makemake option:
--meta:export-libraryTarget name: You may set the target name. The default value is derived from the project name. Makemake option:
-o(If you are building a debug configuration, the target name will be implicitly suffixed with the_dbgstring.)Output directory: The output directory specifies where the object files and the final target will be created, relative to the project root. Makemake option:
-O
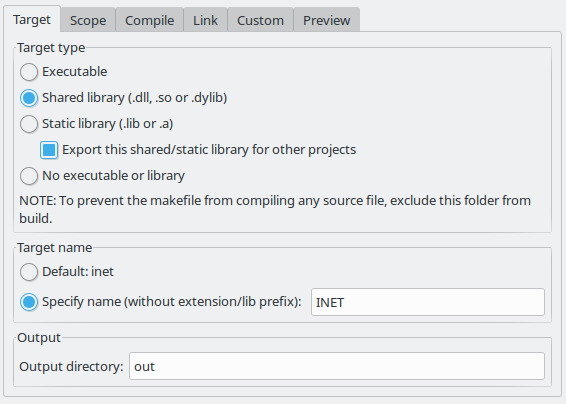
Fig. 80 Target definition
The Scope Tab
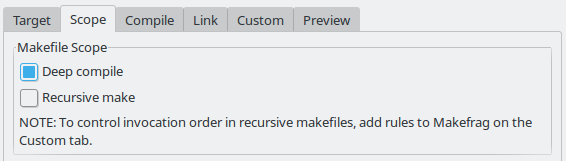
Fig. 81 Scope of the makefile
The Scope tab allows you to configure the scope of the makefile and specify which source files will be included.
Deep compile: When enabled, the makefile will compile the source files in the entire subdirectory tree (except excluded folders and folders covered by other makefiles). When disabled, the makefile will only compile sources in the makefile’s folder. Makemake option:
--deepRecursive make: When enabled, the build will invoke make in all descendant folders that are configured to contain a makefile. Makemake option:
--meta:recurse(expands to multiple-doptions)More » Additionally invoke make in the following directories: If you want to invoke additional makefiles from this makefile, specify which directories should be visited (relative to this makefile). This option is useful if you want to invoke makefiles outside this source tree. Makemake option:
-d
The Compile Tab
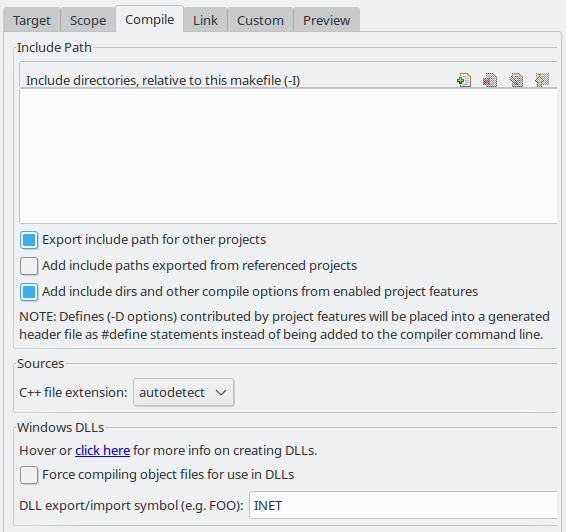
Fig. 82 Compiler options
The Compile tab allows you to adjust the parameters passed to the compiler during the build process.
Settings that affect the include path:
Export include path for other projects makes this project’s include path available for other dependent projects. This is usually required if your project expects other independent models to extend it in the future.
Add include paths exported from referenced projects allows a dependent project to use header files from dependencies if those projects have exported their include path (i.e., the above option is turned on.)
Add include dirs and other compile options from enabled project features: Project features may require additional include paths and defines to compile properly. Enabling this option will add those command-line arguments (specified in the
.oppfeaturesfile) to the compiler command line.
Source files:
C++ file extension: You can specify the source file extension used in the project (
.ccor.cpp). We recommend using.ccin your projects. Makemake option:-e
If you build a Windows DLL, symbols you want to be available from other DLLs (or executables) need to be explicitly
exported from the DLL. Functions, variables, and classes must be marked with __declspec(dllexport) when the DLL is
compiled and with __declspec(dllimport) when you reference them from external code. This is achieved by defining a
macro that expands differently in the two cases. The OMNeT++ convention is to name the macro FOO_API, where
FOO is your project’s short name. The macro should be defined as follows:
#if defined(FOO_EXPORT)
#  define FOO_API OPP_DLLEXPORT
#elif defined(FOO_IMPORT)
#  define FOO_API OPP_DLLIMPORT
#else
#  define FOO_API
#endif
The above definition should be manually placed into a header file that is included by all headers where the macro is
used. OPP_DLLEXPORT and OPP_DLLIMPORT are provided by <omnetpp.h>, and the generated makefile will provide the
FOO_EXPORT / FOO_IMPORT macros that control the macro expansion via a compile option.
The FOO_API macro is used as illustrated in the following code:
class FOO_API ExportedClass {
   // public methods will be automatically exported
};
int FOO_API exportedFunction(...);
extern int FOO_API exportedGlobalVariable;
Settings for Windows DLLs:
Force compiling object files for use in DLLs: If the makefile target is a DLL, OMNeT++ automatically compiles the sources for use in the DLL (defines the
FOO_EXPORTmacro, etc.), regardless of the state of this option. Rather, this option is useful if the makefile target is not a DLL, but the code compiled here will eventually end up in a DLL. Makemake option:-SDLL export/import symbol: Name for the DLL import/export symbol, i.e.,
FOOin the above examples. Makemake option:-p
The Link Tab
Link options allow you to fine-tune the linking steps at the end of the build process.
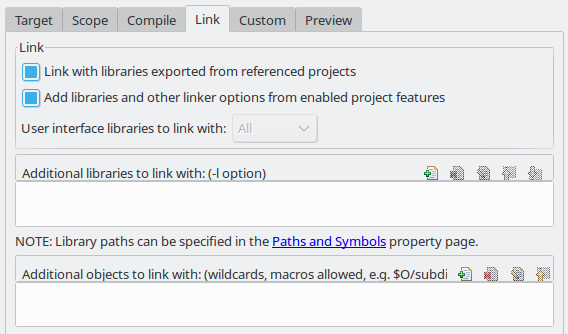
Fig. 83 Linker options
Link with libraries exported from referenced projects: If your project references other projects that build static or dynamic libraries, you can instruct the linker to automatically link with those libraries by enabling this option. The libraries from the other projects must be exported via the Export this shared/static library for other projects option on the Target tab. Makemake option:
--meta:use-exported-libsAdd libraries and other linker options from enabled project features: Project features may require additional libraries and linker options to properly build. Enabling this option will add those command line arguments (specified in the
.oppfeaturesfile) to the linker command line.User interface libraries to link with: If the makefile target is an executable, you may specify which OMNeT++ user interface libraries (Cmdenv, Qtenv, or both) should be linked into the program. Makemake option:
-uMore » Additional libraries to link with: This box allows you to specify additional libraries to link with. Specify the library name without its path, possible prefix (
lib), and file extension, and also without the-loption. The library must be on the linker path, which can be edited on the Library Paths tab of the page of the Project Properties dialog. Makemake option:-lMore » Additional objects to link with: Additional object files and libraries can be specified here. The files must be given with their full paths and file extensions. Wildcards and makefile macros are also accepted. Example:
$O/subdir/*.o. Makemake option: none (files will become plain makemake arguments)
The Custom Tab
The Custom tab allows you to customize the makefiles by inserting handwritten makefile fragments into the automatically generated makefile. This lets you add additional targets, rules, variables, etc., to the generated makefile.
Makefrag: If the folder contains a file named
makefrag, its contents will be automatically copied into the generated makefile, just above the first target rule.makefragallows you to customize the generated makefile to some extent. For example, you can add new targets (e.g., to generate documentation or run a test suite), new rules (e.g., to generate source files during the build), override the default target, add new dependencies to existing targets, or overwrite variables. The dialog lets you edit the contents of themakefragfile directly (it will be saved when you accept the dialog).More » Fragment files to include: Here, you can explicitly specify a list of makefile fragment files to include, instead of the default
makefrag. Makemake option:-i
The Preview Tab
The Preview tab displays the command line options that will be passed to opp_makemake to generate the makefile. It consists of two parts:
Makemake options: This is an editable list of makefile generation options. Most options map directly to checkboxes, edit fields, and other controls on the previous tabs of the dialog. If you check the Deep compile checkbox on the Scope tab, the
--deepoption will be added to the command line. If you delete--deepfrom the command line options, that will cause the Deep compile checkbox to be unchecked. Some options are directly understood by opp_makemake, others are “meta” options that the IDE will resolve to one or more opp_makemake options; see below.Makemake options modified with CDT settings and with meta-options resolved: This read-only text field is displayed for information purposes only. Not all options in the above options list are directly understood by opp_makemake; namely, the options that start with
--meta:denote higher-level features offered by the IDE only. Meta options will be translated to opp_makemake options by the IDE. For example,--meta:auto-include-pathwill be resolved by the IDE to multiple-Ioptions, one for each directory in the C++ source trees of the project. This field shows the opp_makemake options after the resolution of the meta options.
Project References and Makefile Generation
When your project references another project (such as the INET Framework), your project’s build will be affected in the following way:
Include path: Source folders in referenced projects will be automatically added to the include path of your makefile if the Add include paths exported from referenced projects option on the Compile tab is checked, and the referenced projects also enable the Export include path for other projects option.
Linking: If the Link with libraries exported from referenced projects option on the Link tab is enabled, then the makefile target will be linked with those libraries in referenced projects that have the Export this shared/static library for other projects option checked on the Target tab.
NED types: NED types defined in a referenced project are automatically available in referencing projects.
Project Features
Motivation
Long compile times are often an inconvenience when working with large OMNeT++-based model frameworks like the INET Framework. The IDE feature called Project Features enables you to reduce build times by excluding or disabling parts of the model framework that you do not use for your simulation study. For example, when working on mobile ad-hoc simulations in INET, you can disable the compilation of Ethernet, IPv6/MIPv6, MPLS, and other unrelated protocol models. The word feature refers to a piece of the project codebase that can be turned off as a whole.
Additional benefits of project features include a less cluttered model palette in the NED editor, being able to exclude code that does not compile on your system, and enforcing cleaner separation of unrelated parts in the model framework.
Note
A similar effect could also be achieved by breaking up the model framework (e.g., INET) into several smaller projects, but that would cause other kinds of inconveniences for model developers and users alike.
What is a Project Feature
Features can be defined per project. As mentioned earlier, a feature is a portion of the project codebase that can be turned off as a whole, meaning it can be excluded from the C++ sources (and thus from the build) as well as from NED. Feature definitions are typically written and distributed by the project author, and end users are only presented with the option of enabling/disabling those features. A feature definition contains:
ID, which is a unique identifier within the feature definition file.Feature name, for example"UDP"or"Mobility examples".Feature description. This is a brief description of what the feature is or does, for example"Implementation of the UDP protocol".Labels. This is a list of labels or keywords that facilitate grouping or finding features.Initially enabled. This is a boolean flag that determines the initial enablement of the feature.Required features. Some features may be built on top of others; for example, a HMIPv6 protocol implementation relies on MIPv6, which in turn relies on IPv6. Thus, HMIPv6 can only be enabled if MIPv6 and IPv6 are enabled as well. This is a space-separated list of feature IDs.NED packages. This is a space-separated list of NED package names that identify the code that implements the feature. When you disable the feature, NED types defined in those packages and their subpackages will be excluded; also, C++ code in the folders that correspond to the packages (i.e., in the same folders as excluded NED files) will also be excluded.Extra C++ source folders. If the feature contains C++ code that lives outside NED source folders (non-typical), those folders are listed here.Compile options, for example-DWITH_IPv6. When the feature is enabled, the compiler options listed here are either added to the compiler command line of all C++ files or they can be used to generate a header file containing all these defines so that header file can be included in all C++ files. A typical use of this field is defining symbols (WITH_xxx) that allows you to write conditional code that only compiles when a given feature is enabled. Currently, only the-Doption (define symbol) is supported here.Linker options. When the feature is enabled, the linker options listed here are added to the linker command line. A typical use of this field is linking with additional libraries that the feature’s code requires, for example libavcodec. Currently, only the-loption (link with library) is supported here.
The Project Features Dialog
Features can be viewed, enabled, and disabled on the Project Features page of the Project Properties dialog. The menu item is a direct shortcut to this property page.
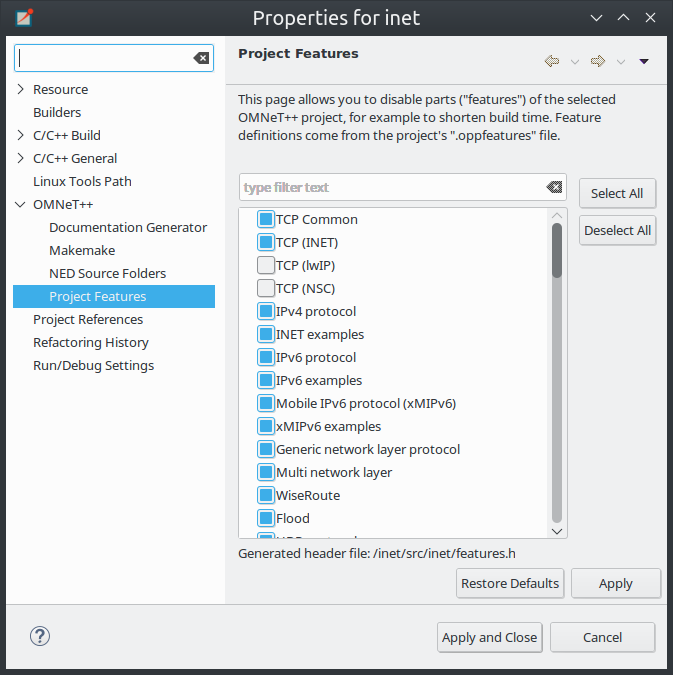
Fig. 84 The Project Features page
The central area of the dialog page lists the features defined for the project. Hovering the mouse over a list item will display the description and other fields of the feature in a tooltip window. Checking an item enables the feature, and unchecking disables it.
When you enable a feature that requires other features to work, the dialog will ask for permission to enable the required features as well. Also, if you disable a feature that others depend on, they will be disabled too.
The Apply, OK, and Cancel buttons work as expected. Restore Defaults restores the features to their initial state (see the Initially enabled attribute above).
Above the list, there is a notification area in the dialog. If the IDE detects that your project’s configuration is inconsistent with the feature enablements, it will display a warning there and offer a way to automatically fix the problems. Fixing means that the IDE will adjust the project’s NED and C++ settings to make them consistent with the feature enablements. Such a check is also performed just before the build.
What Happens When You Enable/Disable a Feature
When you enable or disable a feature on the Project Features page, several project settings will be modified:
NED package exclusions. This corresponds to the contents of the Excluded package subtrees list on the NED Source Folders property page. When a feature is disabled, its NED packages will be excluded (added to the list), and vice versa.
C++ folder exclusions. This can be viewed/edited on the Makemake property page, and also on the Source Location tab of the C/C++ General > Paths and Symbols property page.
Compile options. For example, if the feature defines preprocessor symbols (
-DWITH_xxx), they can be used to generate a header file that contains the enabled macro definitions, and that file can be included in all C++ files.Linker options. For example, if the feature defines additional libraries to link with, they will be displayed on the Libraries tab of the property page.
Note
Feature enablements are saved to the .oppfeaturestate file in the project root.
Using Features from the Command Line
Project Features can be easily configured from the IDE, but command line tools (opp_makemake, etc.) can also use them with the help of the opp_featuretool command.
If you want to build the project from the command line with the same feature combination the IDE is using, you need to generate the makefiles with the same opp_makemake options that the IDE uses in that feature combination. The opp_featuretool makemakeargs command (executed in the project’s root directory) will show all the required arguments that you need to specify for the opp_makemake command to build the same output as the IDE. This allows you to keep the same features enabled no matter how you build your project.
Alternatively, you can choose Export on the Makemake page and copy/paste the options from the
generated makemakefiles file. This method is not recommended because you must redo it manually each time after
changing the enablement state of a feature.
The .oppfeatures File
Project features are defined in the .oppfeatures file in your project’s root directory. This is an XML file, and it
currently has to be written manually (there is no specialized editor for it).
The root element is <features>, and it may have several <feature> child elements, each defining a project
feature. Attributes of the <features> element define the root(s) of the source folder(s) (cppSourceRoots) and
the name of a generated header file that contains all the defines specified by the compilerFlags attribute in the
enabled features. The fields of a feature are represented with XML attributes; attribute names are id, name,
description, initiallyEnabled, requires, labels, nedPackages, extraSourceFolders,
compileFlags, and linkerFlags. Items within attributes that represent lists (requires, labels, etc.) are
separated by spaces.
Here is an example feature from the INET Framework:
<features cppSourceRoots="src" definesFile="src/inet/features.h">
    <feature
        id="TCP_common"
        name="TCP Common"
        description="The common part of TCP implementations"
        initiallyEnabled="true"
        requires=""
        labels=""
        nedPackages="
                       inet.transport.tcp_common
                       inet.applications.tcpapp
                       inet.util.headerserializers.tcp
                      "
        extraSourceFolders=""
        compileFlags="-DWITH_TCP_COMMON"
        linkerFlags=""
    />
How to Introduce a Project Feature
If you plan to introduce a project feature into your project, here’s what you’ll need to do:
Isolate the code that implements the feature into a separate source directory (or several directories). This is because only whole folders can be declared as part of a feature; individual source files cannot.
Check the remainder of the project. If you find source lines that reference code from the new feature, use conditional compilation (
#ifdef WITH_YOURFEATURE) to make sure that the code compiles (and either works sensibly or throws an error) when the new feature is disabled. (Your feature should define theWITH_YOURFEATUREsymbol, i.e.-DWITH_YOURFEATUREwill need to be added to the feature compile flags.)Add the feature description into the
.oppfeaturesfile of your project, including the required feature dependencies.Test. At the very least, test that your project compiles at all, both with the new feature enabled and disabled. More thorough, automated tests can be built using
opp_featuretool.
Project Files
Eclipse, CDT, and the OMNeT++ IDE use several files in the project to store settings. These files are located in the project root directory and are normally hidden by the IDE in the Project Explorer View. The files include:
.project: Eclipse stores the general project properties in this file, including project name, dependencies from other projects, and project type (i.e., whether OMNeT++-specific features are supported or this is only a generic Eclipse project)..cproject: This file contains settings specific to C++ development, including the build configurations; and per-configuration settings such as source folder locations and exclusions, include paths, linker paths, symbols; the build command, error parsers, debugger settings, and so on..oppbuildspec: Contains settings specific to OMNeT++. This file stores per-folder makefile generation settings that can be configured on the Makemake page of the Project Properties dialog..oppfeatures: Optionally contains the definitions of project features..oppfeaturestate: Optionally contains the current enablement state of the features. (We do not recommend keeping this file under version control.).nedfolders: Contains the names of NED source folders; this is the information that can be configured on the NED Source Folders page of the Project Properties dialog..nedexclusions: Contains the names of excluded NED packages.
If you are creating a project where no C++ support is needed (i.e., you are using an existing precompiled simulation
library and you only edit NED and Ini files), the .cproject and .oppbuildspec files will not be present in your
project.