Introduction
The OMNeT++ simulation IDE is based on the Eclipse platform and extends it with new editors, views, wizards, and other functionality. OMNeT++ adds functionality for creating and configuring models (NED and INI files), performing batch executions, and analyzing the simulation results, while Eclipse provides C++ editing, SVN/GIT integration, and other optional features (UML modeling, bug-tracker integration, database access, etc.) via various open-source and commercial plug-ins. The environment will be instantly recognizable to those familiar with the Eclipse platform.
The Workbench
The Eclipse main window consists of various Views and Editors. These are collected into Perspectives that define which Views and Editors are visible and how they are sized and positioned.
Eclipse is a very flexible system. You can move, resize, hide, and show various panels, editors, and navigators. This allows you to customize the IDE to your liking, but it also makes it more difficult to describe. First, we need to make sure that we are looking at the same thing.
The OMNeT++ IDE provides a “Simulation perspective” to work with simulation-related NED, INI, and MSG files. To switch to the simulation perspective, select .
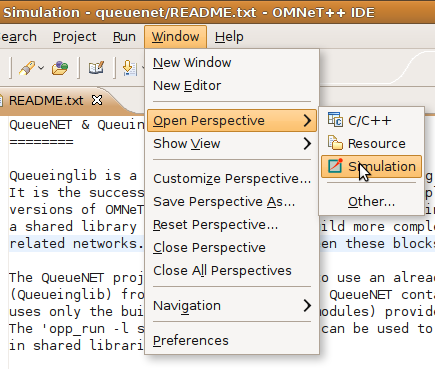
Fig. 35 Selecting the “Simulation Perspective” in Eclipse
Most interface elements within Eclipse can be moved or docked freely, so you can construct your own workbench to fit your needs.
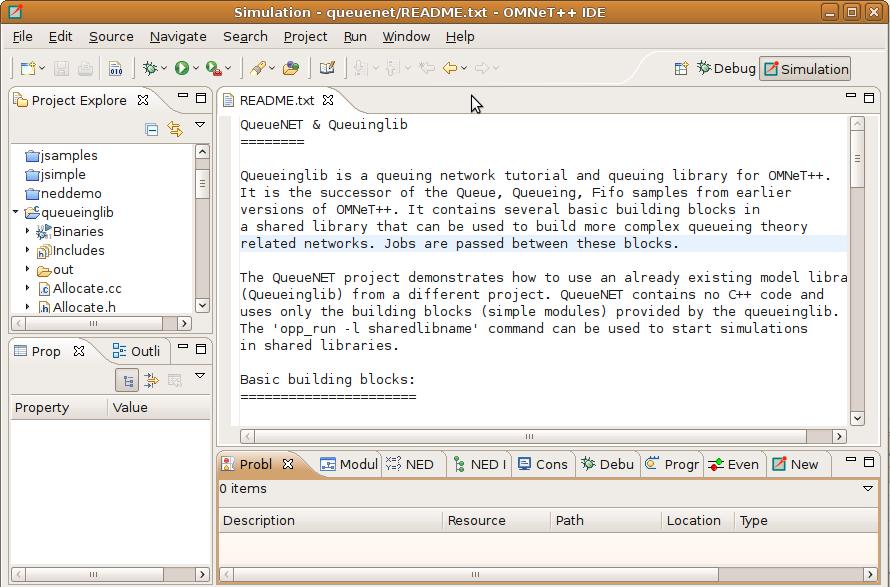
Fig. 36 Default layout of the OMNeT++ IDE
The Project Explorer on the top left part of the screen shows the projects and their content in your
workspace. In the example above, the “queueinglib” demo project is open. You can see the various .ned,
.ini, and other files inside. A number of views are docked at the bottom of the window.
The screenshot shows the open README.txt file in the editor area. When a user double-clicks on a file, Eclipse automatically launches the editor associated with that particular file type.
The Properties View contains information on the particular object that is selected in the editor area or one of the other views that serve as a selection provider. The Problems View references code lines where Eclipse encountered problems.
Several OMNeT++-specific views exist that can be used during development. We will discuss how you can use them effectively in a later chapter. You can open any View by selecting from the menu.
Workspaces
A workspace is basically a directory where all your projects are located. You may create and use several workspaces and switch between them as needed. During the first run, the OMNeT++ IDE offers to open the samples directory as the workspace, so you will be able to experiment with the available examples immediately. Once you start working on your own projects, we recommend that you create your own workspace by selecting . You can switch between workspaces as necessary. Please be aware that the OMNeT++ IDE restarts with each switch in workspaces. This is normal. You can browse workspace content in the Project Explorer, Navigator, C/C++ Projects, and similar views. We recommend using the Project Explorer.
The Simulation Perspective
The OMNeT++ IDE defines the Simulation Perspective so that it is specifically geared towards the design of simulations. The Simulation Perspective is simply a set of conveniently selected views, arranged to make the creation of NED, INI, and MSG files easier. If you are working with INI and NED files a lot, we recommend selecting this perspective. Other perspectives are optimized for different tasks like C++ development or debugging.
Configuring OMNeT++ Preferences
The OMNeT++ IDE preferences dialog is available through the standard preferences menu, which is under the main Window menu item. These settings are global and shared between all projects. The OMNeT++ install locations are automatically filled in for you after installation. The default settings for the NED documentation generation assume that the PATH environment variable is already set so that third-party tools can be found. The license configuration settings specify the preferred license type or custom license text. The IDE will copy the license into new files and projects. The license will also be shown in the generated NED documentation.
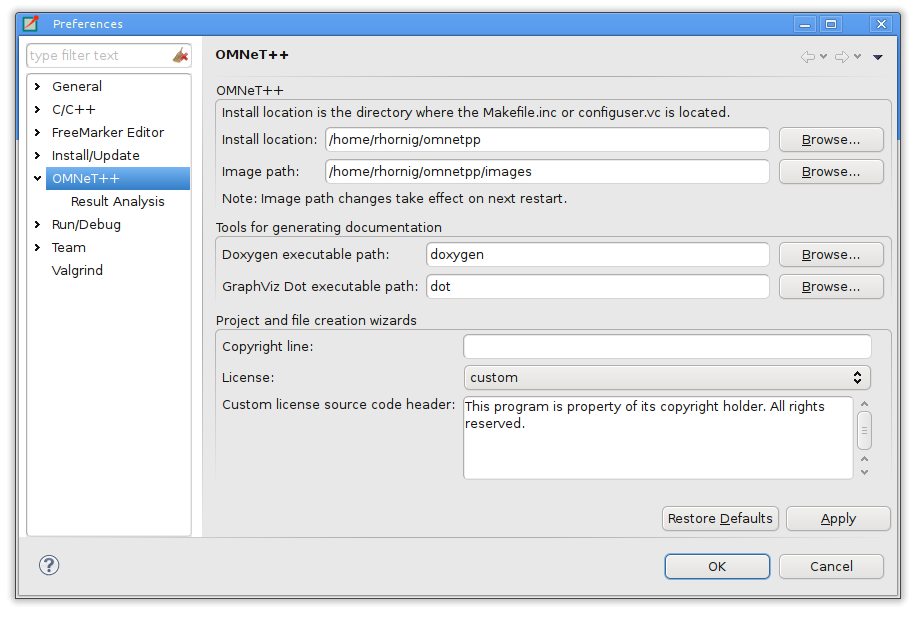
Fig. 37 Configuring OMNeT++ preferences
Use the Browse buttons to find files or folders easily. Specify the full path for executables if you do not want to extend the PATH environment variable.
Creating OMNeT++ Projects
In Eclipse, all files are within projects, so you will need a suitable project first. The project needs to be one designated as an OMNeT++ Project (in Eclipse lingo, it should have the OMNeT++ Nature). The easiest way to create such a project is to use a wizard. Choose from the menu, specify a project name, and click the Finish button. If you do not plan to write simple modules, you may unselect the C++ Support checkbox, which will disable all C++ related features for the project.
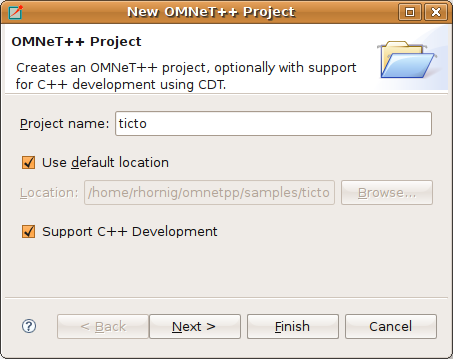
Fig. 38 Creating a new OMNeT++ project
Project References
Most aspects of a project can be configured in the Project Properties dialog. The dialog is accessible via the menu item or by right-clicking the project in the Project Explorer and choosing Properties from the context menu.
An important Eclipse concept is that a project may reference other projects in the workspace; project references can be configured in the Project References page of the properties dialog. To update the list of referenced projects, simply check those projects in the list that your project depends on, then click Apply. Note that circular references are not allowed (i.e. the dependency graph must be a tree).
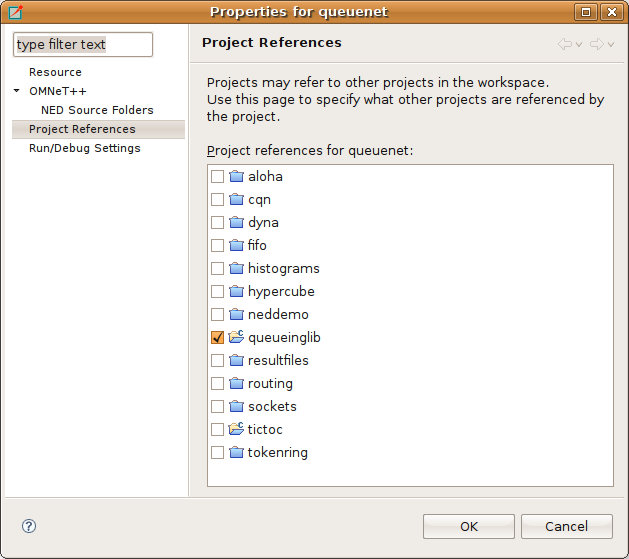
Fig. 39 Setting project dependencies
In the OMNeT++ IDE, all NED types, C++ code, and build artifacts (executables, libraries) in a project are available to other projects that reference the given project.
Note
To see an example of project references, check the “queuenet” and “queueinglib” example projects. In this example, “queuenet” references “queueinglib”. “Queueinglib” provides simple modules (NED files, and a prebuilt shared library that contains the code of the simple modules) and makes those modules available to “queuenet” that contains simulations (networks and ini files) built from them.
Getting Help
You may access the online help system from the menu item. The OMNeT++ IDE is built on top of Eclipse, so if you are not familiar with Eclipse, we recommend reading the Workbench User Guide and the C/C++ Development User Guide before starting to use OMNeT++-specific features.