Editing NED Files
Overview
When you double-click a .ned file in the IDE, it opens in the NED editor. The new NED editor is a dual-mode
editor. In the graphical mode, you can edit the network using the mouse. The textual mode allows you to work
directly on the NED source.
When the IDE detects errors in a NED file, the problem will be flagged with an error marker in the Project Explorer, and the Problems View will show the description and location of the problem. Additionally, error markers will appear in the text window or on the graphical representation of the problematic component. Opening a NED file with an error will open it in text mode. Switching to graphical mode is only possible if the NED file is syntactically correct.
Note
As a side effect, if there are two modules with the same name and package in related projects, they will collide, and both will be marked with an error. Furthermore, the name will be treated as undefined, and any other modules depending on it will also generate an error (thus, a “no such module type” error may mean that there are actually multiple definitions which nullify each other).
Opening Older NED Files
The syntax of NED files has significantly changed from the 3.x version. The NED editor primarily supports the new syntax. However, it is still possible to read and display NED files with the old syntax. It is important to note that many of the advanced features (syntax highlighting, content assistance, etc.) will not work with the old syntax. There is automatic conversion from the old syntax to the new, available both from the NED editor and as an external utility program (opp_nedtool).
The gned program from OMNeT++ 3.x viewed NED files in isolation. In contrast, the OMNeT++ IDE gathers information
from all .ned files in all open OMNeT++ projects and makes this information available to the NED editor. This is
necessary because OMNeT++ 4.x modules may inherit parameters, visual appearance, or even submodules and connections from
other modules. So, it is only possible to display a compound module correctly if all related NED definitions are
available.
Creating New NED Files
Once you have an empty OMNeT++ project, you can create new NED files. Choose from the menu. A wizard will appear where you can specify the target directory and the file/module name. You may choose to create an empty NED file, a simple/compound module, or a network. When you press the Finish button, a new NED file will be created with the requested content.
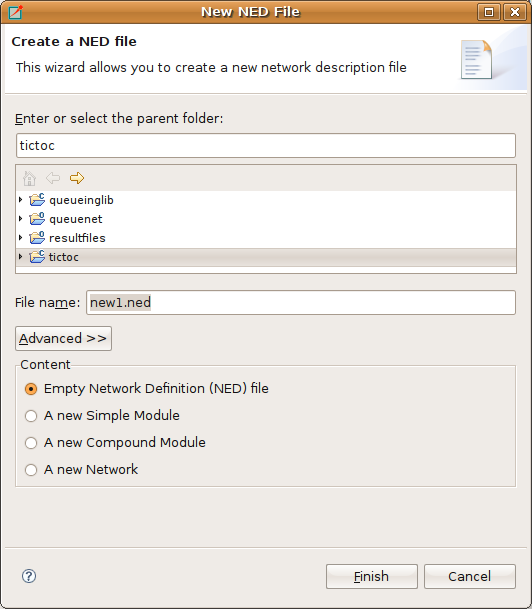
Fig. 40 Creating a new NED file
Tip
Make sure that the NED file and the contained module have the same name. For example, a compound module named
Wireless42 should be defined within its own Wireless42.ned file.
NED Source Folders
You can specify the folders the IDE should scan for NED files and use as the base directory for your NED package hierarchy. The IDE will not use any NED files outside the specified NED Source Folders, and those files will be opened in a standard text editor. To specify the directory where the NED files will be stored, right-click on the project in the Project Explorer and choose Properties. Select the page and click on the folders where you store your NED files. The default value is the project root.
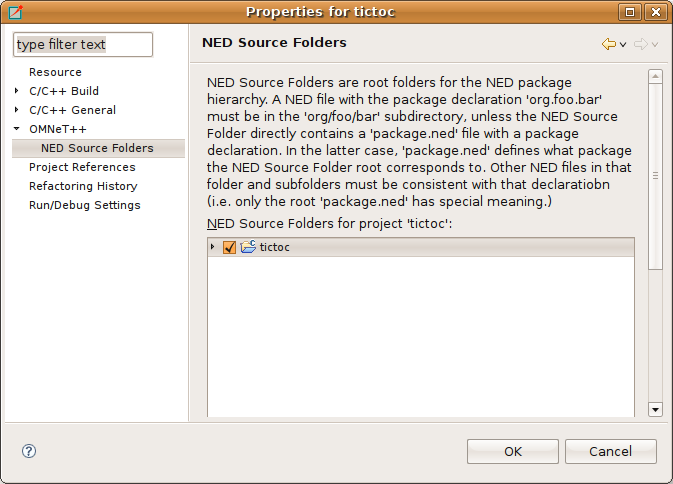
Fig. 41 Specifying the folder where NED files will be stored
Using the NED Editor
To open an NED file, double-click its icon in the Project Explorer. If the NED file can be parsed without an error, the graphical representation of the file opens; otherwise, the text view opens, and the text is annotated with error markers.
Warning
Only files located in NED Source Folders open with the graphical editor. If a NED file is not in the NED Source Folders, it opens in a standard text editor.
You can switch between graphical and source editing modes by clicking the tabs at the bottom of the editor or by using the Alt+PGUP / Alt+PGDN key combinations. The editor tries to keep the selection during the switch. Selecting an element in a graphical view and then switching to text view will move the cursor to the related element in the NED file. When switching back to the graphical view, the graphical editor tries to select the element that corresponds to the cursor’s location in the NED source. This allows you to keep the context, even when switching back and forth.
Editing in Graphical Mode
The graphical editor displays the visible elements of the loaded NED file. Simple modules, compound modules, and networks are represented by figures or icons. Each NED file can contain more than one module or network. If it does, the corresponding figures appear in the same order as they are found in the NED file.
Tip
Place only a single module or network into an NED file and name the file according to the module name.
Simple modules and submodules are represented as icons while compound modules and networks are displayed as rectangles where other submodules can be dropped. Connections between submodules are represented either by lines or arrows depending on whether the connection was uni- or bi-directional. Submodules can be dragged or resized using the mouse and connected using the Connection Tool in the palette.
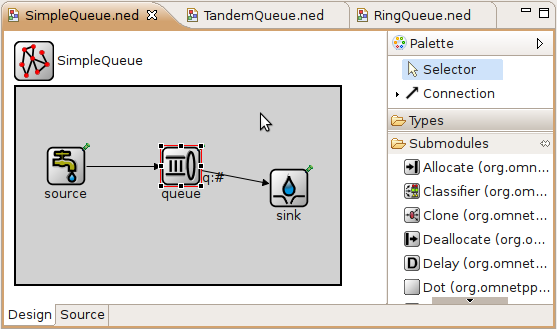
Fig. 42 Graphical NED Editor
The palette is normally on the right side of the editor area. The upper part of the palette contains the basic tools: selector, connection selector, and the connection creator tool. To use a palette item, click on it, and click in the module where you want to place/activate it. The mouse pointer gives you feedback whether the requested operation is allowed. The middle part of the toolbox contains the basic elements that can be placed at the top level in an NED file (simple module, compound module, interface, channel, etc.) and a “generic” submodule. Click on any of these and then click into the editor area to create an instance. The bottom part of the palette contains all module types that can be instantiated as a submodule. They are shortcuts for creating a generic submodule and then modifying its type. They display the default icon (if any) and a short description if you hover the mouse over them. You can configure the palette by right-clicking a button and selecting Settings or filter its content by selecting Select Packages
Right-clicking any element in the edited NED file brings up a context menu that allows various actions like changing the icon, pinning/unpinning a submodule, re-layouting a compound module, or deleting/renaming the element. There are also items to activate various views. For example, the Properties View allows you to edit properties of the element.
Hovering over an element displays its documentation (the comment in the NED source above the definition) as a tooltip. Pressing F2 makes the tooltip window persistent, so it can be resized and scrolled for more convenient reading.
Creating Modules
To create a module or a submodule, click on the appropriate palette item and then click where you want to place the new element. Submodules can only be placed inside compound modules or networks.
Creating Types and Inner Types
To create a type or an inner type inside a compound module, click on the appropriate palette item in the “Types” drawer and then click where you want to place the new element. If you click on the background, a new top-level type will be created. Clicking on an existing compound module or network creates an inner type inside that module.
Creating and Changing Connections
Select the connection tool (if there are channels defined in the project, you can use the dropdown to select the connection channel type). First, click the source module, and then the destination. A popup menu will appear, asking which gates should be connected on the two selected modules. The tool only offers valid connections (e.g., it will not offer to connect two output gates).
Reconnecting Modules
Clicking and dragging a connection endpoint to another module will reconnect it (optionally, asking which gate should be connected). If you only want to change the gate, drag the connection endpoint, and drop it over the original module. A popup will appear asking for the source or destination gate.
Selecting Elements
You can select an element by clicking on it or by dragging a rectangle over the target modules. A compound module can be selected by clicking on its border or title. If you only want to select connections within a selection rectangle, use the connection selector tool in the dropdown menu of the connection tool . The Ctrl and Shift keys can be used to add/remove the current selection. Note that the keyboard (arrow keys) can also be used to navigate between submodules. You can also select using a selection rectangle by dragging the mouse around the modules.
Undo, Redo, Deleting Elements
Use Ctrl+Z and Ctrl+Y for undo and redo, respectively, and the DEL key for deletion. These functions are also available in the Edit menu and in the context menu of the selected element.
Moving and Resizing Elements
You can move/resize the selected elements with the mouse. Holding down Shift during move will perform a constrained (horizontal, diagonal, or vertical) move operation. Shift + resize will keep the aspect ratio of the element.
If you turn on Snap to Geometry in the View menu, helper lines will appear to align with other modules. Selecting more than one submodule activates the Alignment menu (found in both the View menu and the context menu).
Copying Elements
Holding down Ctrl while dragging will clone the module(s). Copy/Paste can also be used on single modules and with group selection.
Zooming
Zooming in and out is possible from the View menu or using Ctrl+-, Ctrl+=, or holding down Ctrl and using the mouse wheel.
Pinning, Unpinning, Re-Layouting
A submodule display string may or may not contain explicit coordinates for the submodule; if it does not, then the location of the submodule will be determined by the layouting algorithm. A submodule with explicit coordinates is pinned; one without is unpinned. The Pin action inserts the current coordinates into the display string, and the Unpin action removes them. Moving a submodule also automatically pins it. The position of an unpinned module is undetermined and may change every time the layouting algorithm runs. For convenience, the layouter does not run when a submodule gets unpinned (so that the submodule does not jump away on unpinning), but this also means that unpinned submodules may appear at different locations the next time the same NED file is opened.
Changing a Module Property
To change a module property, right-click on it and select the Properties menu item from the context menu or select the module and modify that property in the Properties View. Alternatively, you can press Ctrl+Enter when the module is selected. NED properties like name, type, and vector size are available on the General tab. Visual properties like icon, size, color, border, etc. can be set on the Appearance tab. You can check how your module will look in the preview panel at the bottom of the dialog.
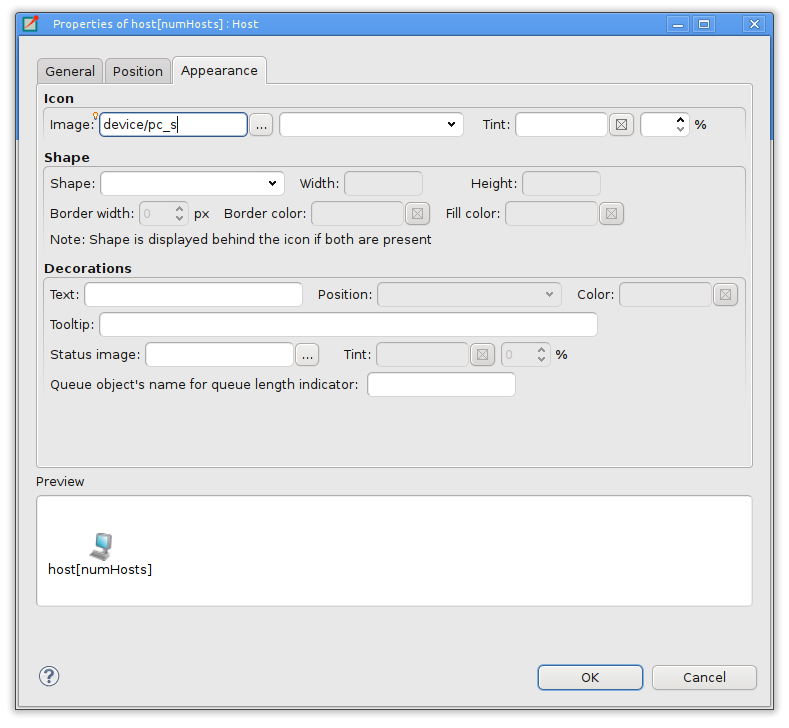
Fig. 43 Editing Visual Properties
Note
You can select multiple modules at the same time and open the Properties dialog to set their common properties simultaneously.
Changing a Module Parameter
To change a module parameter, right-click on it and select the Parameters menu item from the context menu. The dialog allows you to add or remove module parameters or assign values to them.
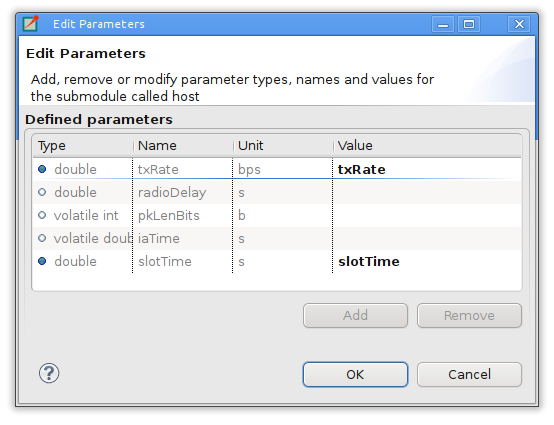
Fig. 44 Editing Module Parameters
Renaming Modules
To rename an existing module, select its context menu and choose Rename or click on an already selected
module a second time. You can specify a new name for the module or even turn a submodule into a vector by adding
[vectorsize] after its name. Alternatively, the name of a module can be set in the Properties dialog or can
be edited by pressing F6 when the module is selected.
Exporting a Module as an Image
A module can be exported using several image formats by selecting Export Image from the module’s context menu.
Navigation
Double-clicking a submodule opens the corresponding module type in a NED editor. Selecting an element in the graphical editor and then switching to text mode places the cursor near the previously selected element in the text editor.
Navigating inside a longer NED file is easier if you open the Outline View to see the structure of the file. Selecting an element in the outline selects the same element in the graphical editor.
To see the selected element in a different view, select the element and right-click on it. Choose Show In from the context menu and select the desired view.
Opening a NED Type
If you only know the name of a module type or other NED element, you can use the Open NED Type dialog by pressing Ctrl+Shift+N. Type the name or search with wildcards. The requested type opens in an editor. This feature is not tied to the graphical editor: the Open NED Type dialog is available from anywhere in the IDE.
Setting Properties
Elements of the display string and other properties associated with the selected elements can be edited in the Properties View. The Property View is grouped and hierarchically organized; however, you can switch off this behavior on the view toolbar. Most properties can be edited directly in the Properties View, but some also have specific editors that can be activated by pressing the ellipsis button at the end of the field. Fields marked with a small light bulb support content assist. Use the Ctrl+SPACE key combination to get a list of possible values.
Note
The following functions are available only in source editing mode:
Creating or modifying gates
Creating grouped and conditional connections
Adding or editing properties
Editing in Source Mode
The NED source editor supports all functionality expected from an Eclipse-based text editor, such as syntax highlighting, clipboard cut/copy/paste, unlimited undo/redo, folding, find/replace, and incremental search.
The NED source is continually parsed as you type, and errors and warnings are displayed as markers on the editor rulers. When the NED text is syntactically correct, the editor has full knowledge of “what is what” in the text buffer.
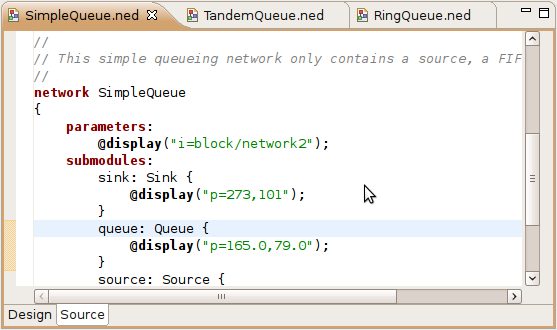
Fig. 45 NED Source Editor
Basic Functions
Undo Ctrl+Z, Redo Ctrl+Y
Indent/unindent code blocks TAB / Shift+TAB
Correct indentation (NED syntax aware) Ctrl+I
Find Ctrl+F, incremental search Ctrl+J
Move lines Alt+UP Alt+DOWN
Tip
The following functions can help you explore the IDE:
Ctrl+Shift+L pops up a window that lists all keyboard bindings, and
Ctrl+3 brings up a filtered list of all available commands.
Converting to the New NED Syntax
If you have an NED file with older syntax, you can still open it. A context menu item allows you to convert it to the new syntax. If the NED file already uses the new syntax, the Convert to 4.x Format menu item is disabled.
View Documentation
Hovering the mouse over a NED type name displays the documentation in a “tooltip” window, which can be made persistent by hitting F2.
Content Assist
If you need help, just press Ctrl+SPACE. The editor offers possible words or templates. This is context-sensitive, so it only offers valid suggestions. Content assist is also a good way to explore the new NED syntax and features.
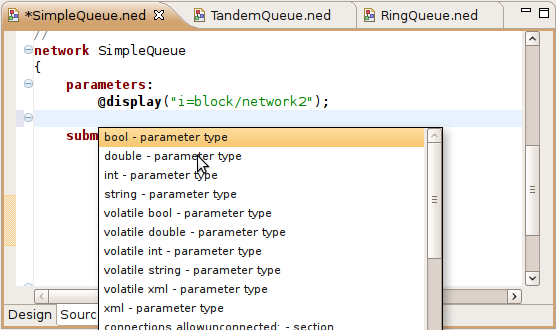
Fig. 46 NED Source Editor with content assist activated
Searching in NED Files
Selecting a text or moving the cursor over a word and pressing Ctrl+Shift+G searches for the selection in all NED files in the open projects. This function lets you quickly find references to the word or type currently under the cursor. The results are shown in the standard Search View.
Organizing Imports
Sometimes, it is very inconvenient to add the necessary import statements to the beginning of the NED file by hand. The IDE can do it for you (almost) automatically. Pressing Ctrl+Shift+O will make the IDE try to insert all necessary import statements. You will be prompted to specify the used packages in case of ambiguity.
Cleaning Up NED Files
This function does a general repair on all selected NED files by throwing out or adding import statements as needed, checking (and fixing) the file’s package declaration, and reformatting the source code. It can be activated by clicking on the menu item from the main menu.
Commenting
To comment out the selected lines, press Ctrl+/. To remove the comment, press Ctrl+/ again.
Formatting the Source Code
It is possible to reformat the whole NED file according to the recommended coding guidelines by activating the Format Source context menu item or by pressing the Ctrl+Shift+F key combination.
Note
Using the graphical editor and switching to source mode automatically re-formats the NED source code, as well.
Navigation
Holding the Ctrl key and clicking any identifier type will jump to the definition. Alternatively, move the cursor into the identifier and hit F3 to achieve the same effect.
If you switch to graphical mode from text mode, the editor will try to locate the NED element under the cursor and select it in the graphical editor.
The Eclipse platform’s bookmarking and navigation history facilities also work in the NED editor.
Other Features
Exporting Images
To export a compound module as a picture, select the compound module and bring up its context menu, select Export Image and choose file name and type. The module will be exported to the file system. BMP, PNG, JPEG, SVG and PDF formats are supported.
It is also possible to export images from all (or selected) NED files; the corresponding wizard can be found under in the menu.
Associated Views
There are several views related to the NED editor. These views can be displayed (if not already open) by choosing in the menu or by selecting a NED element in the graphical editor and selecting Show In from the context menu.
Note
If you are working with very large NED files, you may improve the performance of the editor by closing all NED file related views you do not need.
Outline View
The Outline View allows an overview of the current NED file. Clicking on an element will select the corresponding element in the text or graphical view. It has limited editing functionality; you can copy/cut/paste and delete an object.
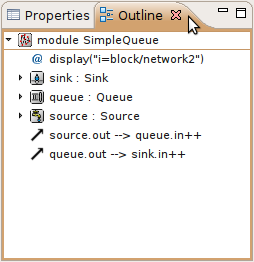
Fig. 47 Outline View
Property View
The Property View contains all properties of the selected graphical element. Visual appearance, name, type and other properties can be changed in this view. Some fields have specialized editors that can be activated by clicking on the ellipsis button in the field editor. Fields marked with a small light bulb icon have content assist support. Pressing Ctrl+SPACE will display the possible values the field can hold.
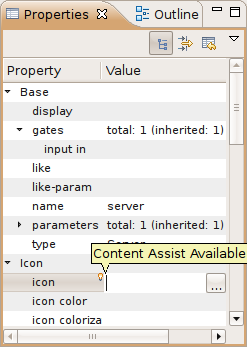
Fig. 48 Properties View
Palette View
The Palette is normally displayed on the left or right side of the editor area and contains tools to create various NED elements. It is possible to hide the Palette by clicking on the little arrow in the corner. You can also detach it from the editor and display it as a normal Eclipse View ().
Problems View
The Problems View contains error and warning messages generated by the parser. Double-clicking a line will open the problematic file and move to the appropriate marker.
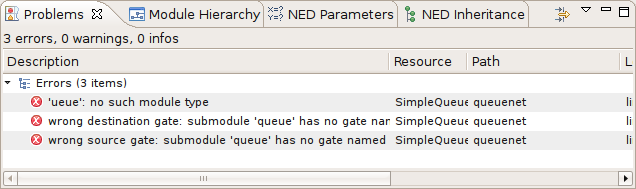
Fig. 49 Problems View
NED Inheritance View
The Inheritance View displays the relationship between different NED types. Select a NED element in the graphical editor or move the cursor into a NED definition and the Inheritance View will display the ancestors of this type. If you do not want the view to follow the selection in the editor, click the Pin icon on the view toolbar. This will fix the displayed type to the currently selected one.
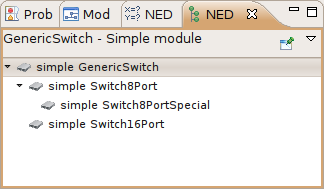
Fig. 50 NED Inheritance View
Module Hierarchy View
The Module Hierarchy View shows the contained submodules and their parameters, several levels deep. It also displays the parameters and other contained features.
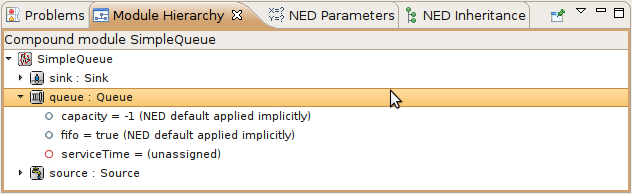
Fig. 51 Module Hierarchy View
Parameters View
The Parameters View shows the parameters of the selected module including inherited parameters.
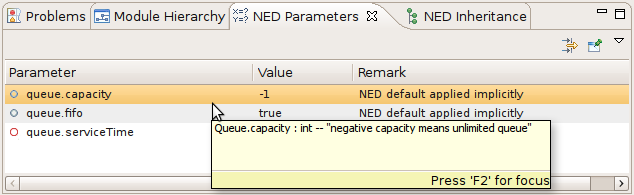
Fig. 52 Outline View
The latter two views are used mainly with the INI File Editor.